

Vinyl is the format that just refuses to die. Back in the late 1990s its days seemed numbered, but since then, slowly but surely, sales have been building.
And we’re glad. It’s a format we like, and it’s capable of a terrific sound, provided you take a bit of care – and this is where vinyl is different from other formats. Unlike the digital alternatives, a lack of care in installation can cripple the final sound.
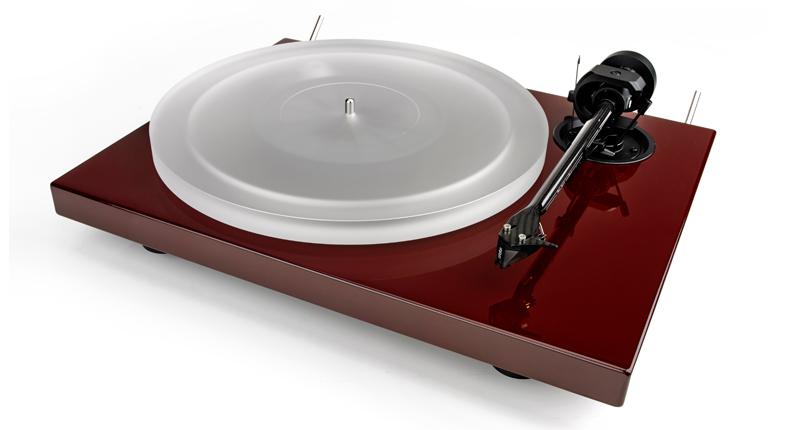
Now there are some great ‘plug and play’ turntables on the market, and for more complex decks, many dealers will help you set it up correctly. But if you’re prepared to get your hands dirty, there’s a lot you can do yourself to ensure you get your turntable performing to its full capability.
So, if you want to know how to get the best sound from your record player, from arm positioning to cartridge fitting, read on.
How do vinyl records work?
Have a close look at a record. That spiralling groove is packed with tiny bumps that cause the cartridge stylus (sometimes called the needle) to move. That movement is converted into an electrical signal by using an electromagnetic mechanism inside the cartridge body.
Consider that the tiny diamond tip of the cartridge is trying to trace bumps as small as a micron (1000th of a millimetre) and you’ll get an idea of just how difficult the task is. Any external vibration will degrade the cartridge’s ability to track the groove accurately.
These disturbances can be caused by many different sources: the sound coming out of the speakers, footfall transmitted through the floor or even passing traffic sending vibration energy through the structure of your house. Yes, really.
As an experiment, place the cartridge on a record but don’t start it spinning. Turn the volume up on your amplifier and try tapping (lightly) on the support, the deck itself and maybe even walking near where the player is positioned. The thumping sound you hear through your speakers is the mechanical energy picked-up by the record player. Loud isn’t it?
When you’re playing a record this unwanted energy is still being fed into the structure of your deck, not only making its life more difficult, but also superimposing itself over the sound of the record. The result? At best, there will be a slight degradation of performance. At worst, awful feedback that spoils everything.
That’s why a decent turntable support is essential if you really want to hear how good your records can sound.
Where to position a turntable

The ideal support would be perfectly level, low resonance and positioned as far away from sources of vibration as possible. Yes, that includes your speakers.
On a hard concrete floor, a floorstanding support will work fine, though such a support will emphasise footfall on a suspended wooden floor. If you have such a floor construction we would recommend investing in a dedicated wall shelf. This kind of support avoids the footfall issue totally. Just make sure you use proper heavy duty mounting screws and fixings or the consequence could be expensive.
Most decks have some sort of isolation built in. This could be something like rubber feet at its simplest, going all the way to a fully suspended design. The better the isolation, the less fussy the deck will be about the support, but even the most sophisticated designs will perform better with careful placement and a good support.
How to level a turntable

Once you’ve got the ideal place to put your record player the next step is to set the deck up properly. This is all about getting the basics right. Everything should be level. It’s important in order to ensure that the stylus tip sits properly in the record groove. Use a small light spirit level to check.
Start with the plinth. If your support is already level – and it should be – there shouldn’t be much to do here.
But, if for some reason you need to make adjustments many turntables have adjustable feet to help you get things spot-on. Next, check the platter is also level. With most decks the platter position is fixed relative to the plinth, and should be parallel to start with unless something’s gone seriously wrong in manufacture. Suspended designs will allow a degree of adjustment.
Usually, the levelling can be done in situ, but some decks require a specific jig, which means a trip to the dealer.
How to adjust tracking force

Back in vinyl’s heyday it was common for people to mix and match decks, arms and cartridges. Today, while it’s still possible to take that approach, we tend to see more deck/arm packages instead, with the choice of cartridge left open. The story is different at more affordable price points. Here, the cartridge tends to be included, which makes life easier. You’ll still have to do some set-up, though.
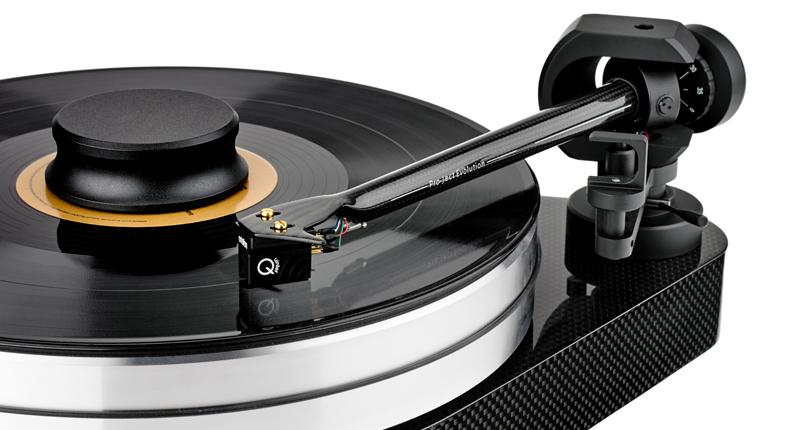
Arm and cartridge adjustments are usually done together. If your cartridge is pre-fitted then it’s relatively simple. All you have to do is to set the tracking force – done by moving the counterweight on the back of the arm – and adjust the bias (sideways force) to compensate for the inward pull of the record groove.
The cartridge manufacturer will recommend a suitable range of downforce, usually between 1.5 -2.5 g, with a specific weight listed as most suitable. This would be our starting point, but with production tolerances and the use of different arms it is possible to get a better sound with a bit of experimentation. It’s best to stay within the recommended range, though.
If the sound is a bit dull and lifeless you’ve gone too heavy, while a thin or aggressive presentation means the tracking weight is a too little light. If you overdo the lightness, perhaps in an attempt to reduce record wear, the cartridge will mistrack, damaging the record grooves in the process. Counter-intuitively, if in doubt, go a touch heavier (just not Crosley heavy). The stylus tip will sit in the record groove with more stability, produce less distortion and cause less damage.
Most arm weights come with markings to help, but if you really want to be accurate it makes sense to buy dedicated cartridge scales. While there are expensive, and very accurate, digital options, there are also plastic alternatives that do the job well enough. These only cost a few pounds.
How to adjust arm height and cartridge alignment
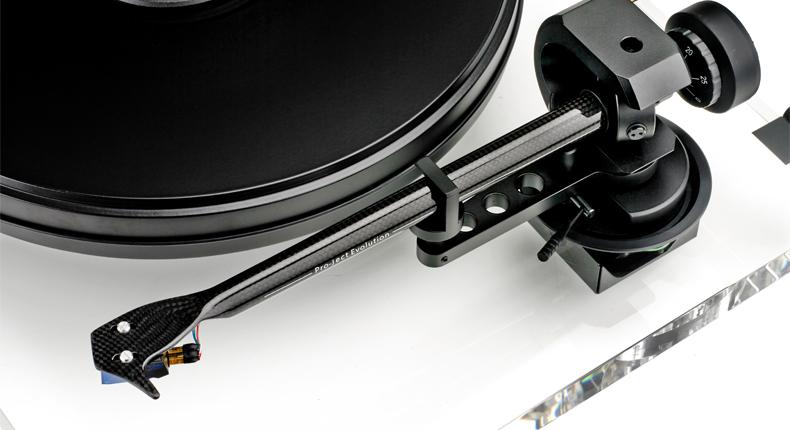
Many upmarket decks allow the user to adjust arm height. Usually the arm is set to be parallel when playing a record, though sometimes a cartridge may have a particular preference depending on its design. Generally though, if the arm is too high you’ll get a bright, forward sound and the opposite if the arm is too low.
If the cartridge isn’t pre-fitted then you’ve got a bit more work to do. Most cartridges are held on with a pair of bolts. These are small and easy to lose, so take care. Some have captive nuts built into the cartridge body, which makes things less fiddly.
Once mounted, you’ll need to connect the thin, fragile arm wires to the cartridge. These are colour coded, but there’s not much space, so you’ll need small long-nose pliers to help attach them. Be careful when doing this. It doesn’t take much to damage the connectors or even break the wires.
Next up is cartridge alignment. You’ll need a gauge to do this. While you can get expensive metal ones, many manufacturers supply a simple but effective card-based alternative in the box. This usually consists of a two points, each surrounded with printed parallel lines.
The idea is to get the cartridge body square to the lines while the stylus tip is placed on each point. This takes a bit of patience, but once the cartridge is aligned properly the stylus top will sit at the proper angle in the record groove, distortion levels will drop and record wear minimized.
It’s worth taking the time to get this right. Errors as small as a degree can lead to large rises in distortion.
How to pick the right phono preamp
Get all these things right and your deck will perform well, though that’s not the end of the story. One of the side effects of the move to digital has been the loss of a phono stage (also known as a phono preamp) from many amplifier designs.
Even if such a circuit is included – in ‘plug and play’ turntables – it’s often an afterthought, with little care taken to maximise sound quality.
What does a phono stage do? It provides extra amplification – the output of a cartridge can be in the order of a thousand times less than a typical CD player – and equalises the tonal balance.
Vinyl isn’t physically able to accept large amounts of bass during recording, and so the tonal range of the music has to be skewed heavily towards the higher frequencies to make things work. On playback, the phono stage’s job is to rebalance this. A good phono stage will let your record player shine. A poor one will have you wondering what the fuss is about.
All but the most basic of phono stages can usually cope with both moving magnet and moving coil cartridges. Moving magnet designs are usually more affordable and produce a higher output.
This is good news for the phono stage is the signal needs less amplification, and so less of a magnifying glass is put on any of the circuitry’s shortcomings.
What’s the difference between MC and MM cartridges?
Any electrical interface, in this case the one between the cartridge and phono stage, requires each to have specific electrical parameters (things like gain and impedance) for maximum information transmission.
Moving magnet cartridges tend to be consistent in terms of their electrical requirements, so phono stage manufacturers can design a single circuit that will suit (almost) all. Things aren’t so simple with moving coils.
High output MC designs aren’t far off their MM cousins in terms of level, while low output variants produce just a fraction of that. This means adjustable gain in the phono stage is desirable to optimise the sound in terms of signal to noise. While 40dB of gain is fine for most moving magnets, MCs will usually need anything from around 50dB to 70dB.
Moving coils also vary in their requirements of resistance, capacitance and inductance – all three add up to make the overall impedance. Get these things right and the interface between the cartridge and phono stage will be better, leading to improved sound.
Most moving coil manufacturers will suggest suitable values for these parameters, but once again feel free to experiment.
In the context of your system it’s possible that slightly different values may work better. Generally, the lower the resistance value the more solid and tonally dull the sound gets. Typical values will be in the region of 100-500ohms.
Capacitance values will normally be from around 200pF (picofarad) to 1nF (nanofarad) – the higher the value the more high treble is filtered. If your system is transparent enough these changes will be easily heard.
The finish line…
Sounds complicated? It can be. Certainly years of using line level sources like CD players, that require little more than to be plugged in, has made getting the most from vinyl seem like something of a black art.
It isn’t, and yes, you can get decent sound straight out of the box, but take a little extra care and patience to get things right, and you’ll be richly rewarded.
Read more at: http://www.whathifi.com