Introduction
There’s nothing more satisfying than having your favorite music available to you throughout your house. Such seemingly complex, multi-room audio setups are often features of high-end homes. Yet, how cool would it be to have the audio from your main system playing in other rooms and speakers in your home? With a simple device called a speaker selector, you too can distribute audio to free standing, in-wall, or in-ceiling speakers across your home.
What is a speaker selector?
A speaker selector is a device that splits the audio signal coming from your receiver or amplifier and sends that same audio signal to two or more sets of speakers. A speaker selector is usually a passive device that uses the amplification power from your receiver or power amplifier to power connected speaker pairs. Most speaker selectors will allow you to connect between two and six sets of speakers.
How Does a Speaker Selector Work?
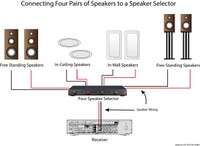
A speaker selector sits between your receiver and speakers and splits the audio signal to all the speakers. Speaker selectors are very straight forward devices. As you can see from the diagram below, you simply connect the speaker output terminals from your receiver (usually Zone 2 or assignable back channels) or amplifier to the speaker selector. You then connect each pair of speakers to the back of the speaker selector. All connections are made with speaker cable.
It’s that simple.
To activate a set of connected speakers, you simply press a button on the front of the selector for the pair you want to activate.
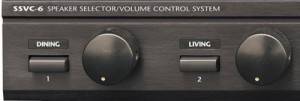
A neat, spouse-friendly feature is labeling. Most speaker selectors come with labels that you can affix to each button so that you know which pair of speakers is the “living room” or “kitchen”, etc.
Installation Considerations
There are a few things you’ll want to be attentive to when you look to install a speaker selector. Specifically, you’ll want to pay attention to:
Your receiver or amplifier’s power output
The amplifier impedance load
The speaker wiring gauge.
These aren’t overly complicated. You simply need to be aware of them:
Receiver or Amplifier Power Output
As a general rule of thumb, most speaker selectors don’t like high powered amps. In fact, you should make it a point to double-check the power handling of the speaker selector you buy. Some models are only rated up to 60 wpc, others to 100 wpc, and yet others to 120 wpc. Some models will even you their peak ratings, which may go as high as 200 wpc. Whatever you do, don’t automatically assume that all speaker selectors are rated to work with all receivers or amplifiers.
When you check the power output of your receiver or amplifier, check its rating into an 8 ohm load. An 8 ohm load is what most speaker selectors use for their ratings. You can then appropriately match the right speaker selector with your receiver or amp.
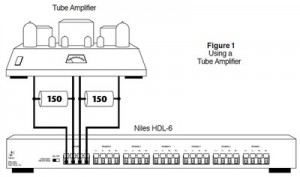
A note about Tube Amps: If you are going to use your speaker selector with a tube amp, you’ll need to be aware of some additional specifics. Almost all tube amps must have a load connected at all times. Speaker selector manufacturers may recommend that you either leave one pair of speakers on at all times or permanently connect a 150 ohm, five-watt resistor across the tube amps output in parallel with the switcher. The speaker selector’s user manual should detail for you any specific recommendations about using tube amps with a speaker selector.
Amplifier Impedance Load
Now that you know the power rating of your receiver or amp, it’s time to see how much of an impedance load it can carry. This is arguably the most complicated part of using a speaker selector, so I’ll break it down for you:
Because you’ll be driving multiple pairs of speakers with your receiver or amplifier, you should double-check to make sure your receiver is stable into the appropriate load, which is calculated in ohms. Your receiver’s or amplifier’s user manual should state this in the specs.
To calculate the total impedance load, you’ll need to know the rated impedance of each of your speakers. Most speakers on the market are typically 8 ohms or 6 ohms. However, there are some are rated at 4 ohms or go even lower.
Once you have the impedance rating of each speaker pair, you’ll now calculate the total impedance load. The great news is that speaker selector manufacturers will usually provide you with guidelines on how to calculate the impedance load. The more speaker pairs you connect, the lower the overall system impedance becomes. For example, if you connect two pairs of 8 ohm speakers, then the impedance drops to 4 ohms. If you connect two pairs of 4 ohm speakers, then the impedance drops to 2 ohms. In case you’re wondering, most manufacturers have you calculate 6 ohm speakers as 8 ohm speakers, but be sure to double-check with the manufacturer. Performing the proper calculation is critical because most receivers and even most amplifiers cannot handle a load below 4 ohms.
Calculating the impedance load can become tricky. To make your life easier, most manufacturers will provide you with a table or chart that instantly shows you the total load. Always follow the manufacturer’s chart; and call them if you have any doubts whatsoever about impedance load questions.
Because multiple speakers increase the load beyond the handling capacity of many receivers or amps, many manufacturers compensate for this by including a button called “protection”. The “protection” button will engage some impedance protection circuitry so that your amplifier will see a safe operating load when it’s playing multiple pairs of speakers at the same time. In general, you’ll want to activate the protection circuitry when the overall system impedance falls below 4 ohms.
With the receiver’s output and amplifier load out of the way, now it’s time to turn our attention to the final detail: the appropriate speaker wire to use.
What Kind and What Gauge Speaker Wiring Should I Use?
Thankfully, there is no special wiring or anything fancy that you need to worry about unless you are going to be running your speaker cables through walls or ceilings. In those specific cases, you should get CL-2 or CL-3-rated speaker cables to conform with local building and fire codes. You should always double-check your local building codes before doing any wiring in wall or in ceilings to determine if you need CL-2 or CL-3 rated cabling. You can check out our Whole House Wiring Basics article if you want to learn even more about wiring your house.
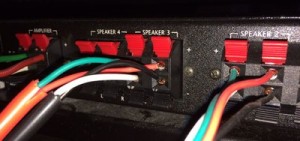
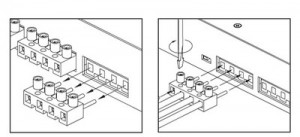
Before you go spending a lot of money on fancy cables, you should know that most speaker selectors have either spring-loaded push design or screws to connect speaker wiring. You’ll be out of luck if you think that they will have traditional biding posts that will accept bananas or spades. They don’t! Whatever wiring you chose must be bare, unterminated wiring—it should not have any banana or spade terminations (at least on the speaker selector end).
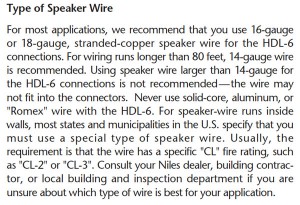
When you buy your speaker wire, pay careful attention to the gauge or thickness of the wire. Spring-loaded and screw-designs on speaker selectors will only accept a maximum of 14 or 16 gauge wiring (the smaller the number, the thicker the wiring). Only in very rare instances will you have a speaker selector able to accommodate 12 gauge wiring.
Once again, be sure to check the specifications on the speaker selector to make sure you have the proper gauge wiring and follow their recommendations on what gauge wiring to use for a particular distance. For most applications, the speaker selector manufacturer will recommend that you use 16 or 18 gauge wiring. I want to mention the manufacturer’s recommendation specifically because online you’ll see various and sometimes widely varying recommendations on what speaker cable gauge to use.
For example, in the Niles user manual for their speaker selector, they recommend 14 gauge wiring only if the runs are longer than 80 feet.
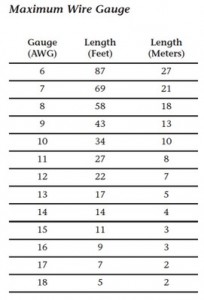
Revel, by contrast, provides this table below in their speaker manuals on the recommended gauge wiring to use. However, the Revel case is for upscale two-channel or multi-channel systems concerned with delivering maximum fidelity. Distributed audio is a different animal and the Niles guideline is more appropriate for this application.
If you’re ever truly in doubt, you can double-check with the speaker selector manufacturer on the appropriate gauge wiring to use for your particular application. Because pairs of speakers connected to speaker selectors tend to be for more background and casual listening, you will tend to find a discrepancy between the speaker selector’s manufacturer’s recommendations and a high end speaker manufacturer’s ratings for a cable of the same length.
Now, if you’re really intrigued and want to know even more about speaker wiring, we’ve provided an in-depth article about speaker cable gauge with our own guidelines and recommendations and how you can calculate various things, such as insertion loss.
What Different Kinds of Speaker Selectors are Available?
With all the basics, covered, now it’s time for understanding the different types of speaker selectors you’ll have to choose from. There are basically two kinds of speaker selectors available:
Traditional Selectors (no volume control)
Speaker Selectors with volume control
With traditional speaker selectors, all they do is send along the same audio signal and volume level to all speakers. That means that all the speakers will be controlled by the master volume on the receiver. If you lower the volume on the receiver, then all the speakers will be lowered together. You cannot raise or lower the volume for one pair without affecting the volume of the other pairs.
If you want to be able to control the volume of each pair of speakers independently with a traditional speaker selector, then you’ll need to add a volume control device in the room where that set of speakers is located. The great advantage to this setup is you can always have the receiver playing at a fixed volume and then independently turn on and off each pair of speakers and also fine tune the volume from the remote room itself.
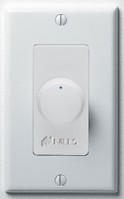
Having a separate volume control give you lots of flexibility and lots of options. For example, you can choose to have a simple manual volume control like the wall dial pictured. However, you can also opt for fancier models. Fancier models will have a push button volume control with a feedback light indicating the volume strength and even have their own remote control. You won’t have to get up from your chair to control or mute the volume! In many cases, those fancier models will also act as IR sensors, allowing you to send IR signals back to your main setup. As you can see, there’s lots of potential with what you can do.
If you do decide to use remote volume controls with built-in impedance matching, you should disable the impedance matching circuits in the speaker selector. Having both the speaker selector and the volume controls with impedance active will make your audio output drop significantly! Once again, if you have any questions, simply call the manufacturer and they will guide you with how to configure the specifics.
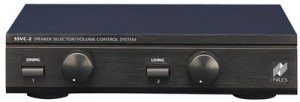
If you want to simplify things, you can also get speaker selectors with volume controls built right in. The benefit of such an all-in-one design is that you’ll be able to control the volume of all your speakers independently from a central location and you’ll cut out the cost of remote volume controls.
As you can see, whether a traditional speaker selector or speaker selector with volume control is right for you all depends on your goals and needs.
What Speaker Selector is Right for Me?
Now that we’ve covered all the basics, you’ve seen that installing a speaker selector is actually fairly easy. Yes, there are some things you need to be attentive to, but it’s not difficult to do.
The question then remains: how can you choose the speaker selector that’s right for you. Here are some thoughts to help you get started:
Decide on how many speaker pairs you’ll want to connect: As you’ve seen from some of the pictures above, speaker selectors come with a per-defined number of speakers you can connect and they are generally in even number pairs: 2, 4, or 6. Don’t shortchange your capacity.
How much power can the selector handle? Choose a selector that can handle the power output of your receiver or amplifier.
Identify where you’ll control volume from: Ask yourself if you’ll want volume control where the speaker selector is located or if you’ll want volume control in the room where the speakers are located. For most people, the preference is to control the volume of the speakers from the room where the speakers are located.
Does the speaker selector offer protection circuitry? Protection circuitry is usually available on 4 or 6 pair models. Some two pair models omit the protection circuitry. While speaker protection is pretty much a basic feature of the well-known brands, you never assume and always check to make sure the feature is there if you’ll need it.
What gauge wiring does the speaker selector accept? Knowing what speaker wiring gauge the selector accepts will help you determine the right speaker cabling to buy.
Where will I place my speaker selector? This may seem like an odd question, but if you are dealing with speaker selectors that power 6 (or more) pairs of speakers, they can get to be somewhat long. Speaker selectors will fit into just about every standard audio rack (like Salamander racks). Just make sure the shelf or table they will be sitting on can handle the width of the unit appropriately. Determining where you’ll place the selector will also help you plan out your speaker cable runs.
Where Do I Start My Search?
Now that you understand the basics and you’ve done your initial homework where do you buy a speaker selector and what brand should you buy? Just like speakers and receivers, there are many reputable brands out there. Niles, Russound, and Xantech are well known brands among others.
You can find these and other brand name speaker selectors available at your local Hi-Fi/home theater dealer and online. Purchasing a speaker selector from your local Hi-Fi/home theater store not only supports the local store but also gives you the ability to leverage their knowledge and experience in helping you choose the right model for your particular situation. A local Hi-Fi store will also sell raw, unterminated speaker cable on spools of any length and likely be able to do all the wiring for you in the event you don’t feel comfortable doing it yourself.
Conclusion
Setting up a whole-house audio system is within reach of the average home theater enthusiast. The simple addition of a speaker selector can bring music and audio throughout your home. With proper planning, you can bring your listening enjoyment to a whole new level throughout your living space.
https://www.audioholics.com/diy-audio/how-to-use-a-speaker-selector-for-multi-room-audio


